
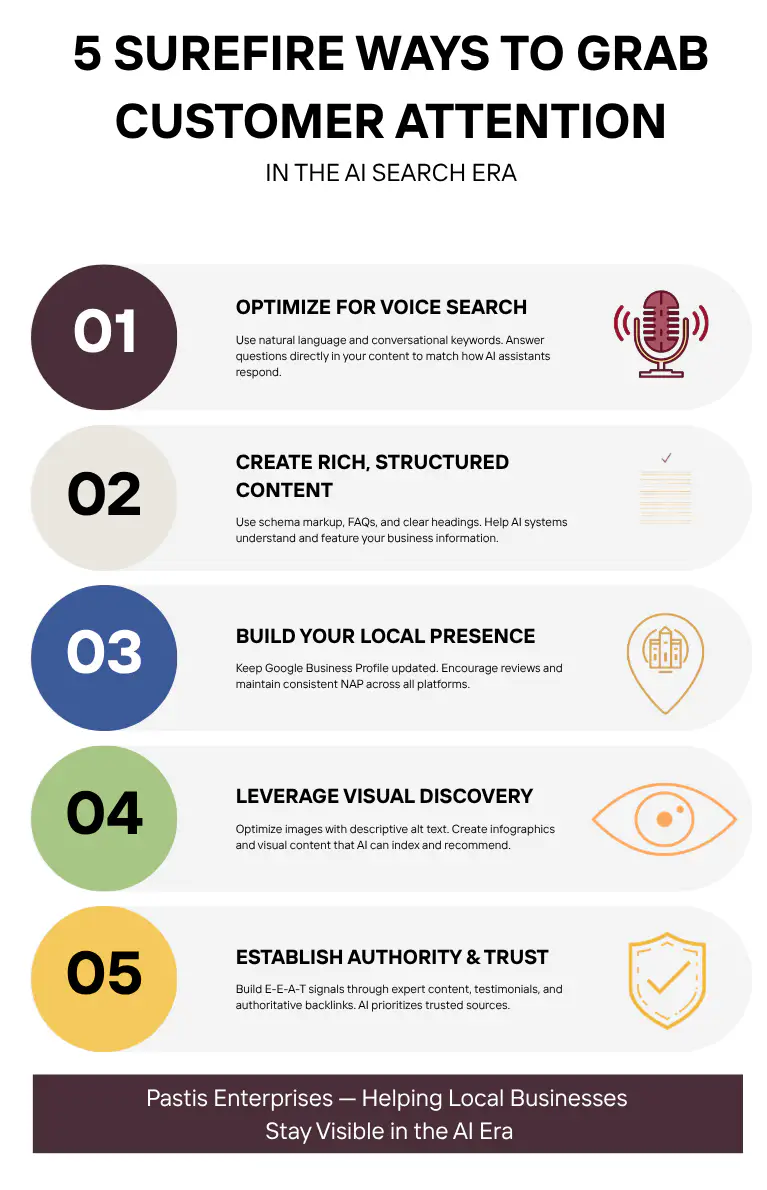
Phoca Gallery is an image gallery for Joomla! CMS. It includes the component, modules and plugins and allows users to display images or Youtube videos in many different styles.
To get started quickly, the first thing you should do is create at least one category to hold your photographs. You can do this from the front end or back end of your site. We’ve created one gallery, creatively called “Sample Gallery.” (Feel free to delete it, or unpublish it if you want to use it as a reference.)
Create a Gallery:
From the backend:
You go to Components » Phoca Gallery » Categories » [New] or [Edit]
To create a category you only need to fill in the title and press [Save]. Phoca Gallery creates the alias. All other fields are optional.
From the frontend:
Make sure you are signed in, then go to User Menu » Add Photos » Main Category or SubCategories
Fill in the title and press [Create]
Uploading images:
From the Backend:
For Adding One Photo:
Go to Components » Phoca Gallery » Images » [New] and press the [image] button besides filename.
For Adding More than One Photo:
Go to Components » Phoca Gallery » Images » [Multiple Add]
You’ll get a screen with 3 boxes. In the first box you see a screen with the files and folders present on you server in images/phocagallery. If you want to upload the image to an existing folder, click on that folder. If you want to upload the image to a new folder, go to the ‘folder’ box and type the folder name and press [create folder].
Next go to upload files, press [browse], select the files you want to upload and press [start upload].
From the Front End:
Go to User Menu >> Add Photos >> Images. Click [Browse] to navigate your computer and locate a photo. Type in a Title and Description. Click [Start Upload] (Note to upload multiple photos all at once, go through your site’s backend).
Adding Your Gallery to the Menu
Once you start creating galleries, you’ll need to create a menu item so your visitor’s can see them. We have already created a sample gallery, we’ll just change it to your new gallery.
From your administrative backend:
Go to Menus >> Main Menu >> Gallery
On the right hand side, under Required Settings, select the name of your new gallery from the drop down list. Then click [Save and Close]

That should get you started with your photo gallery. There are a number of other cool features available with this component, including integration with Facebook and Google Picasa and much more. For detailed instructions on using this application, you can view the developer’s website at phoca.cz/documentation/
We are also available if you need any assistance.


0 Comments